Breanna Rutter presents you all with her brand new hairstyle called Mrs. Rutter’s Crochet Senegalese Twists! These Rope Twist Extensions were achieved on her own natural 4c hair. You can perform this style on relaxed hair as well to achieve similar results.
In The Mrs. Rutter Senegalese Crochet Tutorial, Breanna Rutter informs you of all the products that you will need to achieve this particular hairstyle!
To achieve the Crochet Senegalese Twist Hairstyle, you will need as follows;
(7) Packages of Kanekalon Braiding Hair http://goo.gl/TPSNnC
(2) Color #1B (5) Color #4GOLD
Wide Tooth Detangling Comb http://goo.gl/zLIn9c
Rat Tail Comb http://goo.gl/8Pn9Vm
Duck Bill Clips http://goo.gl/3wFHMf
Hair Cutting Scissors http://goo.gl/rYH7BX
Rubber Bands http://goo.gl/h5p7ou
Bobby Pins http://goo.gl/bLIJA1
Nylon Weaving Thread http://goo.gl/RuvWgG
Curved Weaving Needle http://goo.gl/TvtTzs
Wig Clamp/Wig Block Holder http://goo.gl/4REeuz
The Mrs. Rutter Crochet Senegalese Twists is an advanced hairstyle because you have to know how to do rope twists, crochet braids, and cornrow braids to understand how to follow along with this new hairstyle!
Purchase those DVDs to prepare you for this advanced hairstyle!
Senegalese Twist DVD http://goo.gl/NFUM9y
Crochet Braids DVD http://goo.gl/ne3wBY
Cornrow Braids DVD http://goo.gl/aX5MQd
To follow this Senegalese Crochet Tutorial, you want to make sure that you have purchased the appropriate braiding hair to give you the look and length you desire whether expressions or kanekalon braiding hair is best for you. You can purchase your Senegalese twist color of choice that you would like or you can match the color of your braiding hair to your natural hair color. Make sure that you have all of your hair supplies listed above to do this hairstyle on your own hair or to do this twisted hairstyle on another.
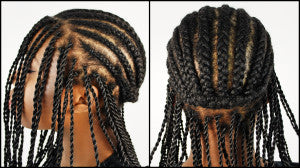
Braid all of your natural hair, relaxed hair or transitioning hair straight to the back in cornrow braids and grab the tail end of your previous braid to add to your current braid. Next you will stitch your last tail end of your braid down to your braid pattern for your crochet braid pattern base.
| VIDEO TRANSCRIPT
Hello and welcome to step number two of the Mrs. Rutter's perimeter crochet Senegalese twist hairstyle in this step I will be teaching you how to do your crochet braid pattern for the specific look now remember this look is an advanced hairstyle so you have to know how to do a couple of things in order to achieve this look first you have to know how to do Senegalese twist cornrow braids as well as crochet braids if you need any more additional help on these styles make sure to refer to my website howtoblackhair.com for those hairstyling DVDs now back to the braid pattern I will be showing you how to do your crochet braid pattern for this look by showing you the direction of how you have to braid your cornrow braids once you bring all of your cornrow braids along the way you will actually feed one end of each cornrow braid into one another and I will show you specifically how that looks when you're done with your braid pattern you will only have one tail end of a braid that hangs down that braid will then be sewn onto the braid to the side of your head with your already prepared weaving needle in order to prepare your weaving needle all you have to do is cut off a little bit of thread threat put the eye of needle bring them two loose ends together and create a knot that simply how you prepare your weaving needle and then after you done that I will show you how to sew the tail end of your braid down to braid pattern to complete your look and remember you have to leave out your perimeter hair in order to do your Senegalese as you can see I am almost finished with my braid pattern for the crochet style the edges of my hair that are braided individual braid is the perimeter area that will contain the Senegalese twist the perimeter will not be crocheted that's why your hair have to be loose to do the Senegalese twists around the perimeter of your head and then the rest of my hair's cornrow braided but I've saved my last braid to show you how you have to connect your cornrow braids along the way up I took my hair down you can see that my braids are pretty much almost finished and then a little bit as time goes on you will see that in the back each braid is connecting so for now I'm going to do is finished my very last braid show you how to connect to braids in the back and then also how to sew the braids down with your weaving needle and thread so now just grab a little hair here this is my last section going to pinch a little bit hair often begin braiding remember if you don't know how to braid make sure to refer to my website for further help on how to actually do cornrow braids so now as I'm nearing the end of my last braid and then go ahead and connect my previous cornrow braid to the braid here so now that I've ended this braid I have braided all the hair that I have for I grab the tail end of my previous braid and I place it onto one of the legs of my cornrow and then I continue to braid this was done for all of the braids you see here that's in the back of my head so now we are constantly connecting the braids you end up with one individual tail end of a braid that hangs down from your last cornrow braid so I am just going to twist the ends a little bit to finish this for now as you can see I have one tail end of a cornrow braid that hangs down here and if you observe some of the braids each cornrow braid was added want to each one until there was literally one left now in order to make sure that your braid pattern is secure in your braids do not unloosen and when you're actually crocheting your Senegalese twist you have to sew on the tail end of your last braid now in order to so it down properly you want to make sure there are no bulges or that it doesn't come unloose so instead of sewing this down to this pattern back here for the base back here you have to so it next to one of your cornrow braids that way the braid is very flat when you're actually crocheting your Senegalese twists so instead of sewing the tail end of your last cornrow braid once you last will break you want to play in between hair so that it lays very flatly so now I'm just going to push this braid right in between the two spaces here and I want to make sure that I'm selling this braids my last cornrow braid that I actually braided so use one hand to keep the braid pressed you are going to grab your needle and thread go underneath your last cornrow and then go through the tail end of your last see going to go underneath and then through the tail end of your last cornrow braid pushed the needle through wrap the string around twice for your needle through to create a knot you’ve created a knot you want to continue to sew up along until the tail end of this braid is completely secured so we can go over just a little bit we can go underneath this cornrow braid and through the tail end braid that we have here in the middle wrap the string around twice pull-through so I was you secure your last then opening up in this type just a little bit more and then just cut your string it's okay if you have a little bit hair right can see here that is because when your crocheting is going to lay very flat in your braid so now next you can send this off and that completes your actual crochet braid pattern this is the braid pattern for the Mrs. Rutter's perimeter crochet Senegalese twist so now once you've completed your braid pattern in the very next step, step number three I will be showing you step-by-step how to do the Senegalese twist and crochet technique |